Carry the Glass Together Obstacle Rankings
Every prop that likes to eat glass, ordered by how often it ends a run.
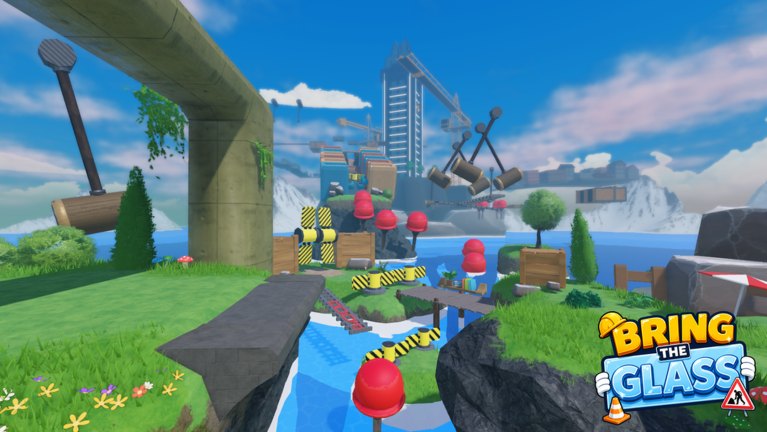
This page is the long form of the tier list hub. It names the props you can see in the official course art: swinging hammers on a gantry, yellow-black striped cylinders, red hard hats, water, planks, hanging pipes, cones, cranes, and the unfinished tower. Use it while sitting at a checkpoint, not while the pane is over the river.
Ranks are for the live Roblox early beta of Carry the Glass Together, not for Don’t Shatter and not for Steam Carry The Glass.
S — Swinging hammers
The gantry in the middle distance of the overview shot is the run killer. Mallets move on a cycle. Your pane has height. If you enter during the down swing, you lose. The correct play is a full-cycle watch from a safe slab, then a walk, not a sprint. The leader calls Now once. If the follower jumps because they are nervous, you still lose. Practice the wait on how to protect the glass.
Do not try to “learn the rhythm” by eating hits. Hammers are not a parry minigame.
S — Stretch and camera split
Not a prop, still S. Two avatars walking apart turn the pane into a rope. Two cameras looking at two landmarks yaw that rope into a cylinder. Fix this in the lobby with controls and a shared heading. If you only rank world objects, you will keep shattering on “nothing”.
A — Striped cylinders and beams
Hazard stripes mean hitbox. They sit on walking lines so you clip them while talking. Rotate the pane parallel, walk, do not hop unless both of you have a clean run-up. These are A instead of S because you control the timing; hammers control their own.
A — Desync jumps
The first water plank is B if you count and A if you do not. A late jump puts one player in the river. Count from the callout sheet. Phone players should be the follower on these so the tighter input leads.
B — Water and broken bridges
The river is obvious, which makes people careless. Water is recoverable if you Hold immediately; it is a shatter if you keep running. Broken concrete ledges near the overpass are the same rank: visible, still hungry. Walk the edge, do not tightrope for clips.
B — Height and cranes
The unfinished skyscraper and crane arms create camera clip and fall yanks. Rank B because you meet them later, after you should already have stance. If you bring S-tier stretch into a B-tier crane, it becomes S. See segment 4 of how to beat.
C — Hats, cones, hanging pipes
Red hard hats are progress jewelry and cheap clips. Traffic cones around the lobby statue are C until you emote into them. Pipes hanging from the concrete overpass will tap a tilted pane. Give them space. They are C because they only kill greedy duos.
D — Grass, flowers, lobby statue
The statue holding glass is a joke, not a hazard. Flowers are D. If you shatter here, you are stretching for content. Warm up, then leave D-tier behind.
Moving the ranks after a patch
If updates add ice, mill blades, or a moving platform, they will enter this table as S or A until we see a week of clears. We will not copy a Steam ice-bridge rank onto this Roblox map in advance.
When you argue with your partner, argue about a row in this table, not about who is “bad”. Then go play the next segment.
Frequently Asked Questions
Quick answers for duos who keep shattering the pane.
Why isn’t water S-tier?
You choose when to jump. Hammers choose when to swing. Water is B if you count.
Are hard hats checkpoints or hazards?
Both, if you clip them. Read checkpoints for the save volume, and give the prop space.
Where is the ice section from Steam?
Not in this Roblox listing. Do not train for it here.
Should we skip S-tier with a script?
No. See script safety.